The end of the year celebrations are synonymous with joy, magic and above all, family sharing. To get into the Christmas spirit and fully enjoy this magical time of year, it is important to create moments of sharing around which all the members of your little tribe would engage in Christmas-themed activities while having fun. And what better way to do this than through Christmas workshops that, in addition to making them jump for joy, would contribute to the development and awakening of your children?
To do this, Kidlee shares with you 3 ideas of Christmas workshops to do at home and with very little money!
Christmas workshop with salt dough:

Both economical and fun, salt dough is undoubtedly one of the favorite activities of children. Ideal for developing their fine motor skills, it also contributes to the development of the imagination and creativity of the youngest. Moreover, making salt dough objects with your little ones will make you spend a great time with your family. So why not take advantage of the vacations to make a Christmas workshop and make beautiful decorations to hang on the tree or to offer to your loved ones?
Plan at least one long day (morning and afternoon) or two days for this workshop. Because salt dough takes time to cook! You can therefore devote a first time to the making of the salt dough and the realization of the shapes (stars, fir trees, hearts...). The second time will be dedicated to the decoration of your creations with paint, glitter, beads and other small ornaments.
To make the salt dough, we found a great recipe at zenidees. On their site you will also find a lot of decorating ideas, tips and advice for an easy salt dough:
To make your salt dough, you will need:
- 1 cup of flour (about 250 g)
- 1/2 cup table salt (about 125 g)
- 1/2 cup of water (about 125 mL).
- Coin trays
Preparation:
- Start by preheating the oven to its lowest setting and line a baking sheet with parchment paper.
- Provide a large bowl and have your children mix the flour and salt with their little hands. Add the water and help them stir until the mixture becomes a ball.
- Transfer the dough to a floured work surface and roll it out with a rolling pin.
- Then accompany your little ones in cutting out the shapes with cookie cutters of their choice.
- Place your ornaments on the covered baking sheet and bake for about 3 hours or until solid. Let cool and then paint and decorate your creations.
To inspire you in your realizations, Marie Clair proposes you a nice selection of decoration ideas just HERE !
Christmas Cookie Workshop:
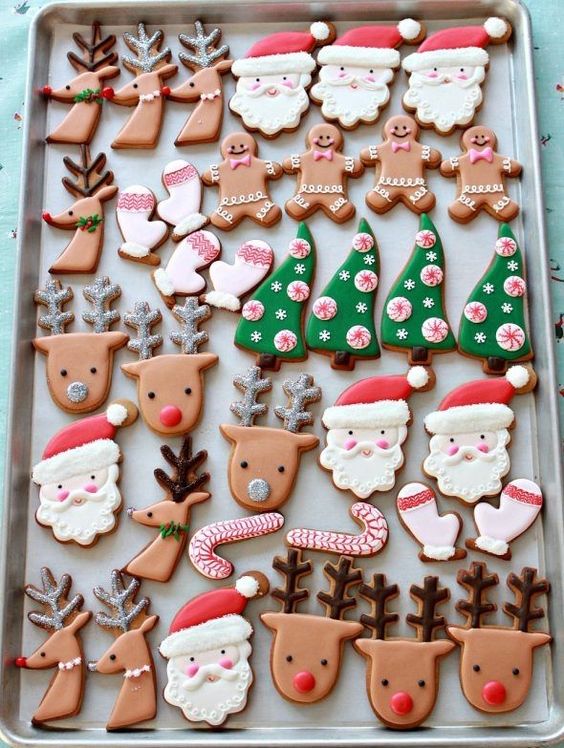
Cooking is an excellent developmental activity for children. Making small dishes, pastries or desserts contributes to the development of the 5 senses and the autonomy of the youngest. It is also a great activity to encourage discussion and complicity between family members. A Christmas workshop in the best pastry chef mode will be an excellent opportunity to share, together, the magic and the spirit of Christmas. And let's face it: Christmas workshops where you can taste good things are always popular with youngsters.
To make beautiful and tasty Christmas cookies with your children, start by making a shortcrust pastry. This will serve as a base for all the cookies in your Christmas workshop. You will be able to make different kinds of cookies without having to make a new dough each time.
For the shortcrust pastry, we share with you our favorite from Lucile in Wonderland :
For the shortbread dough you will need :
- 140g of powdered sugar
- 260g of soft butter
- 2 egg yolks (choose large eggs and save the whites for the glaze)
- 420g of flour
- 1 pinch of salt
- Optional: one sugar spoon of vanilla flavoring
- Cookie cutters in the Christmas spirit
The steps of realization
- Have the children place the ingredients one by one in a bowl, making sure to name them all. Then mix all the ingredients together until they form a ball.
- Depending on the consistency of the dough, let it rest for 30 minutes in the fridge. And during this time, you can preheat the oven to 180°.
- After the break, let your children flour the work surface. Then you will have to roll out the dough, leaving a thickness of 4 to 5 mm.
- Tip: Lucie from the blog Lucile in Wonderland recommends cutting the dough into two balls to make it easier to make.
- Once the shortcrust pastry is well rolled out, you can cut it out with your cookie cutters.
- Carefully place your shortbread on a baking sheet lined with parchment paper and bake for 12 to 15 minutes.
- At the end of the baking time, remove the shortbread from the oven and let it cool on a flat surface. Use a spatula to transfer them.
- AttentionThey are still a little soft when they come out of the oven! It is therefore important to wait until the shortbread is cold before starting to decorate it with your children!
Your shortbread is cold? You can start decorating and let your imagination run wild. Whatever the result, the most important thing is that you have fun with your family!
For decoration inspiration, discover 20 decorating ideas selected by moma the blog by clicking just HERE !
Christmas workshops in recycling mode: Christmas village made of cardboard!
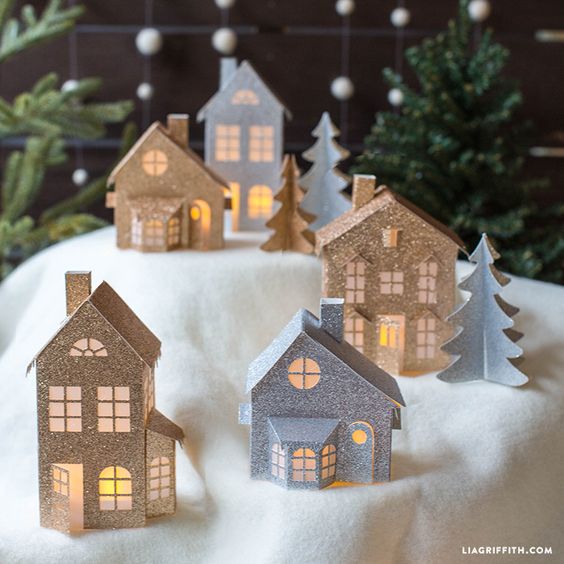
Christmas is one of the best times to indulge in the joys of recycling. You can take advantage of the festive season to make all sorts of recycled decorations in Christmas workshop mode. To put at the foot of the tree, on the mantelpiece, on a piece of furniture or as a centerpiece, a Christmas village made by you will be the star attraction of your festivities that will dazzle more than one!
The Christmas village is a timeless and traditional symbol of Christmas. It reproduces a scene from the life of a village during the Christmas holidays. The village can be animated, luminous, in a forest, minimalist or inhabited by various figurines. There are A thousand and one ways to build your Christmas village without breaking the bank! Take advantage of this opportunity to make a craft workshop to share with your little ones.
And there's nothing easier than making these houses out of cardboard. Your children can then redesign them as they wish.
To make your cardboard village you will mainly need :
- Of cardboard boards
- A pair of scissors and/or a cutter
- A pencil and a ruler
- A glue gun
- Templates (you will find them in download HERE )
- Paint, printed tape, colors, markers and/or other decorative accessories
For the realization we are inspired by the site VITA AED which offers a range of ideas for Christmas villages:
All you have to do is print the templates of the houses that will make up your village ( small house, average, large )
Then cut out the houses and place them on your cardboard sheets. Trace the contours and cut out your cardboard with scissors or a cutter.
Once all the pieces are cut out, you can glue them together with hot glue or adhesive to form the houses.
Once all the houses are created, it's time for art! Let your children's imagination run wild when it comes to decorating the village. They can paint them in different colors, add glitter, funny figurines and trees, everything is possible in your family Christmas village!
Discover also a great video tutorial, proposed by L&E Créations TUTO - DIY - Sonia's workshop :