A few days ago we told you about gourmet DIY to do with children for the Easter holidays, today, Kidlee is back with a new activity idea! Don't panic, we always stay in the Easter theme. But this time, we use our little hands for a selection of Easter crafts and activities to do with the kids!
Send a note for Easter
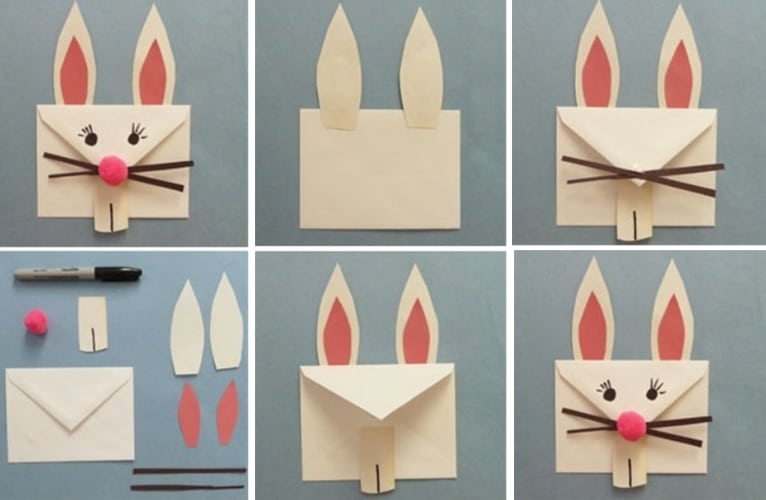
Nothing is more original than an Easter bunny envelope! For this super easy activity, first print the templates for the ears and teeth (here). After that, for the eyes, you'll have to rely on the drawing talents of everyone. Moreover, you should not forget the little pompom that will serve as a nose. Kids will love to make this great craft idea. Isn't this rabbit so cute?
Easter crafts: the chick who comes to say hello
As we love little chicks at Kidlee, we had to offer you an activity in this theme to keep your children busy in a funny way!
Material
For this great tuto concocted by 10fingeryou will need:
- strong cards (assorted colors)
- a wooden tongue
- round stickers
- white glue
- scissors
- a wooden pencil
- a template for the egg and chick to print
- felt pens
Method
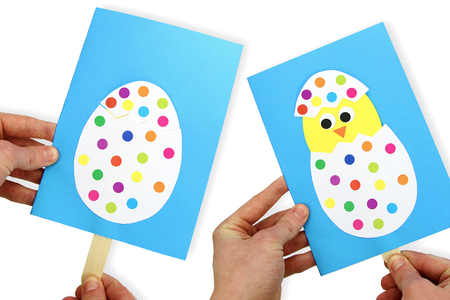
First, choose a strong A4 card in the color of your choice and fold it in 2. Now it's time to take out the egg and chick template that you printed. Using the template, draw the outline of the egg on a light colored card, then cut it out. Using a pencil, trace the "cracks" in the egg to cut it in half. Cut out the egg with the scissors. With the template, trace the outline of the chick on a yellow card and cut out the shape.
Now it's time to get out the stick and white glue. First, glue the top part of the eggshell to the top of the yellow shape. Then glue the wooden tab to the back of the yellow shape (the end of the tab should be halfway up the yellow shape).
Make a notch about 2 cm wide located about 2.5 cm from the bottom of the blue card (centered on the width) and slide the tab into it. The tab should come out of the inside of the card. Also, apply glue around the bottom of the eggshell (only on the dotted area).
We remind you that the central part of the shell must not be glued so that the chick can later enter and exit the egg easily. Next, glue the bottom part of the egg about 1.5 cm from the bottom of the blue card. Finally, cut out the chick's eyes and beak from a strong card and glue them onto the yellow shape. Then, all that's left to do is decorate the egg with markers or stickers.
Coloring for Easter
Among the favorite Easter activities of children, coloring is always at the top of the list. Yes, coloring chicks, Easter baskets, Easter trees or Easter eggs, all during the Easter vacations, it's almost happiness for the kids! (We've repeated the word Easter too many times now, haven't we? )
In short, you are looking for free printable drawings to be able to do an Easter coloring session with the kids? Whether it is for Easter bunnies, Easter bells, Easter chicks or Easter eggs. You will surely find your happiness on modelling head, Momes or even Hugo the snail.
Besides stimulating their motor skills, concentration and creativity, Easter coloring is really ze easy peesy lemon squeezi activity to do with kids. Also, the child-made colorings are so unique that they can be sent as cards to loved ones to wish them a happy Easter.
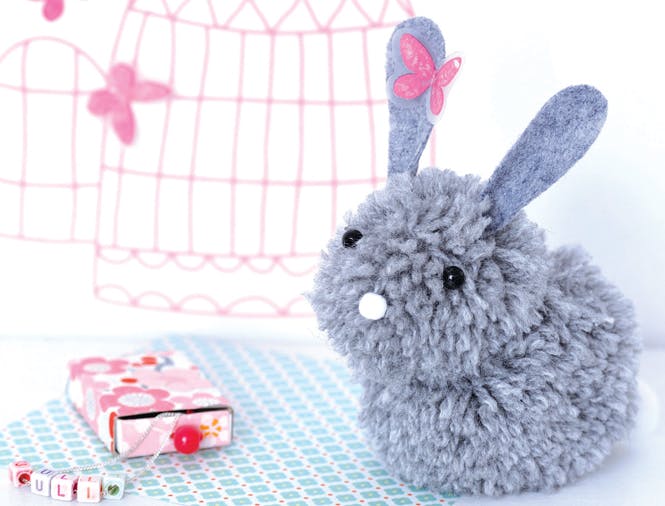
Easter crafts: a pom-pom bunny
For this DIY, you will need:
- 10m of wool in the color of your choice
- 7 x 5 cm of felt of the same color as the wool
- 2 small black pearls
- 1 white mini-pompon
- 1 medium white pompon
- fabric glue
- scissors
- cardboard
We start by bringing the pom-poms to life. First, cut out two cardboard circles, each 6 cm in size. Make a notch in them and hollow out the center. Then make a second base of 8 cm. Wrap 4 m of wool around the small template and the rest of the wool (about 6 m) around the large template. Cut the wool between the two cardboard circles, holding the strands of wool in the center with the other hand. Then, spread the two cardboard boxes a little bit apart and pass a 20 or 30 cm wool thread between the two circles and tie the two ends together. And there you have it, your pom-poms are ready!
Then, we attack the second step which is to attach the pompoms together by knotting the strands of wool. Also, cut out two paper ears of about 6 cm. Then, glue the ears on each side of the smallest pompon. Finally, glue the black beads to make the eyes and the white mini pompom for the snout, as well as the medium pompom for the tail.
Easter crafts: another Easter Bunny!
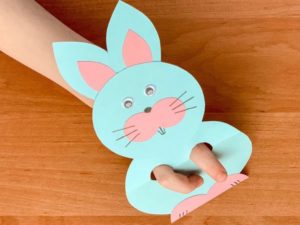
Material:
- one sheet of blue and one pink paper (or other colors)
- small mobile eyes
- glue
- a cotton ball
- a black pencil
- a pair of scissors
Method
Start by cutting out the bunny's body shapes from the leaves based on the picture. Then assemble them and glue them together to make the bunny. Also, fold the sheet slightly at the top of the body and punch two holes as shown in the photo. All that remains is to glue the eyes and draw the nose, whiskers, teeth and claws. Do not forget to glue the cotton ball at the back to make the tail. Thus, the Easter Bunny is ready. Finally, just slip your fingers through the holes to launch this wonderful bunny into the egg hunt.